Category Archives: More Than Four

Hallow’s Eve Chocolate Bark

Can you all believe that the month of October is pretty much over?

Where have all the days gone?

The days just flew too quickly! I swear it was my sister’s birthday, then my uncle’s, my dad’s, and my close family friends (aka my other uncle’s) birthday just one after another. It was a “bam, bam, bam” scenario when it comes to their birthdays. Well more so for my oom (uncle in Dutch), my dad, and dear Bruce as they are within a few days of each other. But still!

And tomorrow is the eve of Halloween!

Are you all set for the festivities that come with the thirty-first?

I’m not! I still need to get more latex and other special effects for my boyfriend’s face! I’ll show you a photo of what I will be doing to him.

Two Face Harvey Dent

And if you don’t know what exactly is going to be done, here is a little instruction demo about what you can do with liquid latex. I did this to him to figure out what I am doing:

His mom called frantic!

I don’t even have anything for my own costume! We also haven’t even carved out pumpkins!

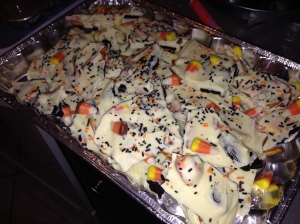
BUT I did make a cool and spooky bark for this afternoon for work. I don’t work on Saturday so I thought I’d spice up the work day with some candy corn and black and orange sprinkles.

I got the recipe for the bark from Family Fresh Meals. The direct link to the recipe can be found here though.

I tried to follow the recipe. Well actually I did, I just couldn’t for the life of me find tiny candy eye balls! All I can think of is that Americans must be odd with their candy eyes on normal shelves in stores.

Though I am rather sad that none of our Oreo cookies have an orange or yellow filling to go with the season. They are all white and boring!

Ingredients:

  • 4 – 225g bags white chocolate chipits
  • 8 Oreo cookies, broken up into chunks
  • 1 cup (112g) pretzels, broken into pieces
  • 1 cup (1,248g) candy corn
  • 1 teaspoon black sprinkles
  • ½ teaspoon orange and black sprinkles

Instructions:

  1. Melt the white chocolate at a low heat until smooth. Stir frequently to prevent burning.

  2. While chocolate is melting, line a cookie sheet with parchment paper and cover with cookie chunks, pretzels, and candy corn.

  3. Once chocolate has completely melted, pour over cookie sheet. Spread with a spatula to ensure chocolate is evenly distributed over everything.

  4. While chocolate is still sticky, scatter candy corn on chocolate, sprinkle sprinkles, and pop in refrigerator until hard.

  5. Break into chunks and enjoy!

Halloween BarkHalloween Bark

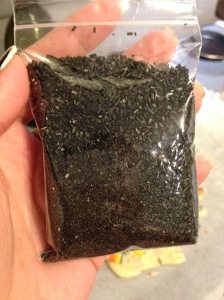
The black sprinkles are too cool for words. They have a bit of a sparkly sheen to them! I got them at a special baking store actually! The baking store is attached to a bakery that sells classic French pastries, like macarons, croissants, and éclairs! How lovely, right?

Black Sprinkles

I found out that I love lavender madeleine’s though! I even bought a mold to try and make them myself.

We’ll see if I will be able to make madeleine’s! I hope I can!

Black and Orange sprinkles

As you can see these are my other sprinkles! I have a feeling I will be decorating everything in orange and black for a good while! I may make a funfetti cake with orange and black sprinkles. That would be neat. Or a chocolate funfetti cake, you know as the orange would be the only thing sticking out? Actually do people ever do that?

Whatever! That was my masterpiece and I cannot wait to bring it into work! Even with the big boss lady coming in. I’m sure she will enjoy it!

Hope you all have a spooky Halloween!

Authentic Sweet & Tart Lemon Meringue Pie

Growing up, my absolute favourite dessert to eat was lemon meringue pie. I remember desiring as my birthday cake even! But when I think of a lemon meringue pie I think of a light fluffy meringue which is browned from the heat of an oven, you know with those beautiful browned tips? Well I recently tried a lemon meringue pie here and I was so incredibly put off. My friends who are both South African told me that what I had was what is South African but I even googled photos of what I know as the pie and was told off that that isn’t what is known here.

They use meringue cookies as a meringue topping!

So I thought I would make a lemon meringue pie as I know it to show my friends. Last night I made a lemon meringue pie from scratch to test on my parents and if it turned out amazingly I would later make another one for my friends. Thankfully mom and dad both loved the pie that I will most definitely be making another one!

Though I am never whisking my egg whites to make a meringue again. It took me probably more than thirty-five minutes to make a meringue. My right arm was ready to fall off. I was even wishing Austin had hands instead of paws so he could have whisked for me. If he could speak he would have told you that too.

Meringue Held Up

Anyway, I got the recipe from the Spiced Blog. I did look at multiple lemon meringue pie recipes but this one seemed the easiest to read and make. The direct link for the recipe can be found here.

Fresh Lemon Meringue Pie

Ingredients:

  • 1 batch of phyllo pastry, store bought
  • 4 egg yolks
  • 1 ½ cups (340g) white sugar
  • 6 Tablespoons (9.38g) cornstarch
  • 1 1/3 cups (315ml) water
  • ½ cup (118ml) lemon juice
  • 1 Tablespoon lemon zest
  • 3 Tablespoon unsalted butter
  • 4 egg whites
  • ¼ teaspoon cream of tartar
  • ½ teaspoon vanilla extract
  • 6 Tablespoons (19g) white sugar
  • Powdered sugar

Instructions:

Pie Crust

  1. Preheat oven to 218ᵒC (425ᵒF)
  2. Roll the pie dough into a 9” (23cm) pie pan, press pie crust into dish and poke with several holes from a fork. Bake for 17-20 minutes or until shell is a golden brown color.
  3. Remove pie crust from oven and allow to cool.

Lemon Filling

  1. In a medium bowl, slightly beat the egg yolks and set aside.
  2. In a medium saucepan, combine sugar, cornstarch, water, lemon juice, and lemon zest. Bring mixture to a boil on medium-high heat.
  3. Once mixture begins to boil, gradually stir about ½ cup into the bowl with the egg yolks.
  4. Transfer egg yolk mixture back into the saucepan with the remaining lemon juice mixture. Whisk until combined and bring mixture to boil over medium-high heat, stirring constantly.
  5. Remove saucepan from heat and stir in butter. Transfer filling into the cooled pie crust.

Meringue Topping

  1. Preheat oven to 176ᵒC (350ᵒF)
  2. Using a medium bowl, combine egg whites, cream of tartar, and vanilla. Whip until foamy.
  3. Gradually add the sugar and continue whipping until meringue is stiff and glossy (this took me 35+ minutes, so use a mixer)
  4. Spread the meringue on top of the lemon filling, dust pie with powdered sugar and bake for 8-10 minutes or until meringue turns light golden brown. Allow pie to cool to room temperature and then cover lightly and place it in the refrigerator.
  5. Serve chilled.

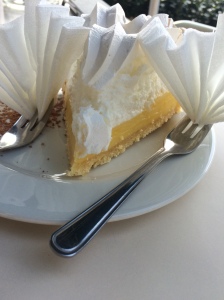
Lemon Meringue Slice

Although my arm (and back) hurt from overworking, the pie came out PERFECTLY!

Though personally I wouldn’t have dusted the pie with powdered sugar, so next time I’ll probably omit that, though it did turn out quite well.

It is just a shame that as of today both mom and dad are on a diet of only meat and veg meaning no more pie for them. Luckily our housekeeper will be coming in tomorrow and she has quite the sweet tooth. So much that I’ve notice she even at my homemade baked dog treats I made last month! Thankfully they were vegetarian and more like a sweet treat with agave and honey in it with cinnamon. That wouldn’t have been good if they were non-vegetarian with ground beef in them – YUCK.

So hopefully Lizzie will eat more than enough of the lemon meringue pie! Someone should and I’d rather it not be me! Anyway I hope you all enjoy this recipe and make it yourself!

Happy eating!

Spana-what? Greek Spanakopita for Dinner!

Happy Sunday everyone!

Hope you all have had a lovely weekend! Was yours also a long weekend with Mayday – international labour day?
Well all weekend long I’ve been thinking about making Spanakopita, but I got lazy. Thankfully my mom knows when I’m getting lazy and asked whether I am up to making dinner. If I don’t give a proper response or make a certain face, she then pipes in that we should have takeout. For this I am glad that she knows me so well.

Thankfully I was able to make the Spanakopita today! Have you ever heard of Spanakopita? If not let me explain it to you. It is a Greek pastry made with spinach and feta, wrapped in phyllo pastry and then baked. You can find it at any Greek restaurant worldwide. If not, you should really wonder what sort of restaurant you are at!

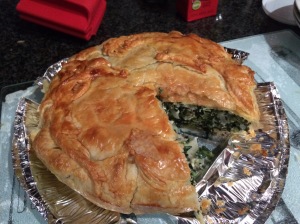
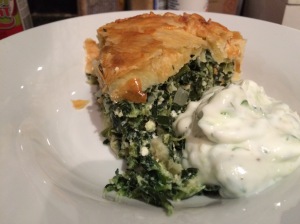
Spanakopita

So I got the recipe from the wonderful website Budget Bytes, a great food website for uni students who want to eat proper food besides KD Mac n Cheese or ramen and want to keep it rather cheap. The direct link to the Spanakoptia recipe can be found here.

Ingredients:

• 1 Tablespoon olive oil
• ½ yellow onion, chopped finely
• 2 cloves garlic, minced
• 1 cup (225g) cottage cheese
• ¼ cup (25g) parmesan cheese
• 1/8 teaspoon allspice
• Pinch of salt and black pepper
• 2 large eggs
• 16 oz (453g) frozen spinach, drained and dried
• 1 sheet puff pastry
• 2 Tablespoons flour
• 1 large egg, beaten for egg wash

Instructions:

1. Preheat oven to 190ᵒC (375ᵒF).

2. In a small frying pan, sauté yellow onion and garlic cloves on low heat until fragrant and soft. Remove from heat.

3. In a medium bowl, mix together cottage cheese, parmesan cheese, allspice seasoning, salt and pepper, and two eggs.

4. Once mixed well, combine onion, garlic, and spinach with cheese mixture and set aside.

5. Dust a clean work space with flour and roll out sheet of puff pastry. Roll out pastry to be a 30 cm by 30 cm square (12”x12”). Drape the rolled dough over 9 inch pie dish.

6. Spread spinach mixture inside pastry-lined pie dish. Spread corners of the pastry back over top of spinach filling. If they do not reach each other it is okay.

7. Brush egg wash over pastry and place in oven for 45 minutes or until golden brown.

8. Enjoy!

I don’t know about you, but for my family we can’t enjoy any Greek food without tzatziki! Tonight wasn’t any different. The spinach pastry tasted absolutely FABULOUS with the tzatziki, actually it made it TEN times better. Mom even told me that I may have made the best tzatziki she has ever had. Even better than a restaurant? She said yes!

Spanakopita and tzatziki

Now that is some tzatziki if mine is better than any restaurant grade stuff!

Interested in this fabulous recipe? Just look below!

Ingredients:

• ½ large cucumber, unpeeled
• 1 cup (245g) plain Greek yoghurt
• 4 large garlic cloves, minced
• 2 Tablespoons olive oil
• 1 Tablespoon vinegar
• ½ teaspoon salt
• ½ teaspoon ground pepper
• 1 Tablespoon dried dill

Instructions:

1. Grate cucumber and drain through a fine mesh sieve, preferably overnight in the fridge. (I drained it by hand in a half hour and then squeezed the last bits of liquid from a paper towerl)

2. Combine the yoghurt, garlic, oil, vinegar, salt, pepper, and dill in a large bowl and cover. Refrigerate overnight, (or until needed as I did)

3. Transfer grated cucumber into yoghurt mixture and stir to combine. Serve chilled.

Heaven in a bowl is this.

Anyway, I didn’t quite follow the tzatziki recipe, well I did, I just utilized a whole other yoghurt type. Usually I would prefer to have the basic Greek yoghurt, but I got Bulgarian yoghurt. Have you ever heard of that before? I sure haven’t!

Plain Bulgarian Yoghurt

I got the recipe for the tzatziki recipe from the Wanderlust Kitchen, however the direct link for the recipe can be found here.

It is a real hit and you all should truly try it. You can enjoy tzatziki with bread, pitas, or any specific Greek treats!

I hope you all make this entire dish and enjoy it thoroughly just as we have!

Happy eating!

My Mexican First – Vegetarian Mushroom and Black Bean Burritos!

“If you are not from Mexico, what’s the first thing that comes to your mind when you talk about Mexican food?”

Well according to this blog I just read, its burritos. But really? Burritos is what you think about?

I think about beans. Though that may be due to the fact that I know what Mexicans-Americans are called when you want to be rude and disrespectful. In Spanish that word we used to be offensive is “frijolero”, this translates to beaner. It is the Spanish version of the horrible word Chink for a Chinese-American person or Gringo for an American or white person.

Anyway, if I am being fully honest, when I think about burritos I think about Americans. Although I know burritos originally come from Mexico, I think about Americans and how all my American friends love Taco Bell and burritos and all that other good stuff.

I actually don’t think I have ever had a burrito. I can recall most of what has gone in my mouth, but a burrito may not have ever been something I’ve ingested.

So yesterday was the first time I ever got to eat a burrito! Boy are they filling! But now I see why Americans like them so much. The recipe I followed was meant to make the burrito a Sriracha rice infused wrap, but A) I can barely handle spice and B) what exactly is Sriracha? Besides this thing all the Americans are raving about!

I got the recipe from Amuse Your Bouche though the direct link to the recipe can be found here.

Vegetarian Burrito with Chipotle Dipping Sauce

Ingredients:

  • 1 cups (210g) basmati rice
  • 1 Tablespoon olive oil
  • 1 can (425g) diced tomatoes
  • 3 teaspoons paprika powder
  • 2 teaspoons cumin
  • 1 Tablespoon Tabasco sauce
  • Salt and pepper
  • 1 Tablespoon olive oil
  • 1 large clove garlic, minced
  • 1 cup (100g) mushrooms, sliced
  • 5 large flour tortillas
  • 1 can (425g) black beans
  • ¾ cup (86g) cheddar cheese, grated
  • ½ cup (25g) cilantro, chopped

Instructions:

  1. Preheat oven to 190ᵒC (375ᵒF)

  2. Boil rice as directed on package, approx. 15-20 minutes.

  3. Meanwhile in a medium wok heat up olive oil and pour in diced tomatoes and begin to cool. Mix in paprika powder, cumin, Tobasco sauce (you can add more if desired), and salt and pepper.

  4. Once rice is cooked, mix tomato and Tobasco sauce mixture into rice and set aside.

  5. In another frying pan (or reuse wok) sauté garlic and sliced mushrooms until fragrant and soft.

  6. To assemble the burritos, place large tortilla on a sheet of tin foil just a bit larger than wrap. Spoon three heaping tablespoons of rice in centre of the tortilla, spoon a couple tablespoons of black beans on rice, one tablespoon of mushrooms on beans, sprinkle with cheddar cheese, and top with chopped cilantro.

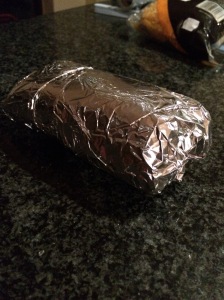
  7. Fold tortilla wrap into a large roll and fold tin foil around tortilla roll tightly. Place in preheated oven and cool for twenty minutes.

  8. Serve and enjoy!

Assembly of Vegetarian Burrito
Rolling of Burrito
Rolling of Burrito

You can also freeze the burritos if you do not want to cook them yet! But I’d cook them – as they are delicious! Though I’m sure they’d be better with Sriracha infused rice, but as a non-American I do not know what that truly tastes like. Though someone recently told me (and I’m quoting him) that it is so hot it makes you shit yourself. He however used less words and more emojis.

Well the recipe that you read above here is on the bland side if you like a kick in your meals, so in case you may feel it is kind of boring so I did make a dipping sauce (which is also a salad dressing)! My dad likes to add some pimiento to his meals, whether it be Sambal bajak or like last night, this dipping sauce. I got the recipe for the salad dressing/dipping sauce from here. Notice that this person has the same background/layout! I’ve not seen it on another persons blog before until now!

If you are wondering how large each of the burritos look like, here is a picture of each of the burritos when laying on our baking sheet before I baked them!

5 Burritos on Baking Sheet

If this is what all burritos taste like, I am hooked. Anyway, I hope you all enjoy this recipe as much as my family and I have.

Happy eating!

Bringing Canada to South Africa one treat at a time!

Ever wanted to go to Canada? I know a lot of people who have dreamt of one day exploring the vast and beautiful country of Canada and believe it or not, I was once like that myself. Although I was briefly there at an age where adults do not remember anything, but that is just the thing, I couldn’t recall it. And because I couldn’t recall it I longed to return at an older age. To explore and enjoy snow.

I only had my first pair of jeans at the age of ten or so. Before that I lived a life in shorts and skorts. So when we moved to Canada, my family and I had to get all warm clothes so we could handle the weather. Especially as it was the very peak of winter where it got up to -18C sometimes.

Anyway I know many South Africans who love the idea of going to Canada but fear the cold. Though honestly, I wouldn’t blame them.

So instead of them venturing to the icy cold country, I thought I would bring some of it to South Africa.

No, I did not get an artificial snow machine though that would have been cool. No instead I made a great Canadian treat that is often enjoyed at weddings and large parties alike. Although these are loved at parties, anyone could go to a grocery store or frozen food store such as M&M’s Meat Shops to buy these treats.

What are they called? Nanaimo bars!

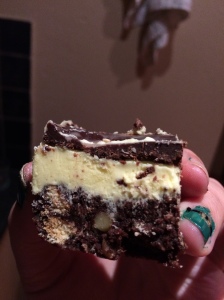
Look at the layers!
Look at the layers!

Nanaimo bars are these extremely sweet treats with a bottom layer of a chocolate cookie base, a middle layer of a vanilla custard, and an upper layer of chocolate and these beautiful things come from the town of Nanaimo in British Columbia. I believe the woman who made these treats entered a competition and won with these things making them the hit of the country! Now they are enjoyed nationwide by everyone.

And this week they were enjoyed worldwide as I made them for my friends and family to enjoy.

Nanaimo Bars

I got the recipe from this adorable blog called I Wash You Dry – how cute is that name? There are a bunch of great recipes on there! The direct link to the recipe can be found here. I did follow everything to a T though I wish I didn’t when it came to the upper level of the Nanaimo Bars. I just struggled like crazy when it came to the chocolate layer. You’ll see later in photos. However below is the recipe:

Ingredients:

Bottom layer

  • ½ cup (115g) margarine, softened
  • 5 Tablespoons cocoa powder
  • ½ cup (100g) sugar
  • 1 teaspoon vanilla extract
  • 1 egg, lightly beaten
  • 1 ½ cups (150g) Digestive cookies
  • ½ cup (64g) walnuts, chopped
  • 1 cup (75g) coconut flakes

Middle layer

  • ½ cup (115g) margarine, softened
  • 2 Tablespoons vanilla custard powder
  • 3 Tablespoons heavy cream (I used a vegetarian cream substitute)
  • 2 cups (280g) powder sugar

Upper layer

  • 1 cup (200g) chocolate chips
  • 3 Tablespoons margarine
  • 2 Tablespoons heavy cream

Instructions:

For crust:

  1. Line tin with parchment paper and set aside.
  2. In an oven safe bowl, melt margarine until turned into a complete liquid. In a larger bowl add cocoa, sugar, and vanilla extract. Once margarine is melted, add to cocoa and sugar in bowl and mix well. Whisk in egg and mix until incorporated. Once egg is mixed add crushed cookies, walnuts, and coconut flakes.
  3. Scoop mixture into prepared tin and flatten out. Pop into refrigerator to allow to set.

For custard:

  1. In a large bowl whisk together softened butter, custard powder, and cream until light and fluffy.
  2. Add powdered sugar to custard mixture bit by bit until custard is light and fluffy.
  3. Remove tin from refrigerator and spread custard on crust layer and smooth out. Return tin to fridge to prepare upper layer of Nanaimo bars.

For chocolate:

  1. Melt chocolate, butter, and cream in an oven safe bowl until chocolate is soft. Whisk until melted and smooth. Let cool for 10-15 minutes.

  2. Pour on top of bars and smooth out, chill in fridge until set and cut into small squares.

  3. Store in fridge and enjoy!

So I really hate this top layer. Really really.

Why? Well for some reason the chocolate formed a gross oiliness to it. Like when you are making a soup and the upper layer has an oily layer? The only word I can think of is “vet” this being the Dutch word for fat. Well the upper layer of the Nanaimo bars retained a lot of fat. To the point where after applying the chocolate to the custard layer I had to pat THREE paper towels on the chocolate to absorb all the oil.

Paper towel grooves in chocolate
Oil from butter in chocolate

I think the worst thing is that it wasn’t the margarine that did it. I made two Nanaimo bar recipes, one with margarine and the other with unsalted butter. The SAME thing happened with both recipes. I’m not sure what I did differently from the original recipe, but my Nanaimo bars looked gross when not patted down.

Regardless of this issue I had, my Nanaimo bars came out perfectly. I brought them to tea after Pilates this morning and they were thoroughly enjoyed by all. I even got my one friends son to give in to my treats. He who is VERY strict about his diet and exercising. I am very chuffed about that.

If you all are interested in visiting Canada but cannot handle the cold, these Nanaimo bars are the way to handle all! I hope you all enjoy them!

Happy eating!

South African Creole Fusion from a Favoured Cookbook!

I miss the days where we would get fabulous recipes from cook books. Don’t get me wrong though, I love finding recipes online too. It is just that those recipes you tend to find in cook books are usually delightful and wholesome. If they were published in a book, they must be the best of the best! Online you have to dig through millions of recipes before you find one which truly is amazing.

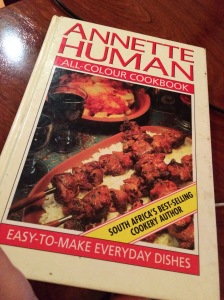
All-Colour Cookbook by Annette Human

Well as of late one of my friends has been spoiling me with South African treats of all sorts. A few weeks ago I tried a koeksister which is a little cookie type thing. Last week I got to try a melktert, this being the Afrikaans way of spelling out “milk pie”, however in Dutch it would be spelled as “melktaart”. This took me forever to realize that a tart or pie in Dutch is not the same as it is in Afrikaans. Yet they are pronounced the same.

Afrikaans eh? They really changed Dutch words to make it more their own.

Anyway, my lovely lovely friend who has been introducing me to South African treats also loaned me one of her mama’s cookbooks which was written by a South African woman. Ever heard of Annette Human? No? Well she is a well-known food writer in South Africa! And from reading this cookbook I see why!

For the recipe I made for this evening, this is the blurb she wrote before writing out the recipe:

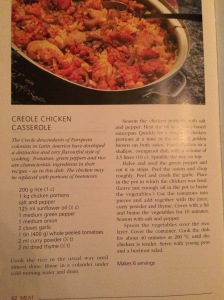
“The Creole descendants of European colonists in Latin America have developed a distinctive and very flavourful style of cooking. Tomatoes, green peppers, and rice are characteristic ingredients in their recipes – as in this dish. The chicken may be replaced with portions of boerewors.”

For those of you who don’t know boerewors is the Afrikaans spelling of “farmer’s sausage”.  As I do not eat red meat, this is not for me, but my family and friends love it as well as other South African meat treats such as droëwors (droge worst) or in English “dry sausage” and biltong. Biltong is the South African version of beef jerky when simply described to foreigners.

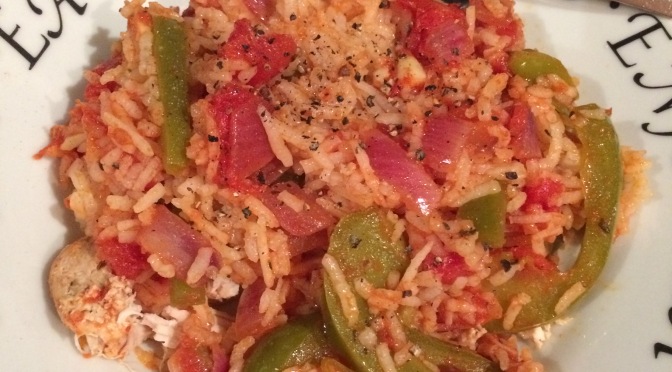
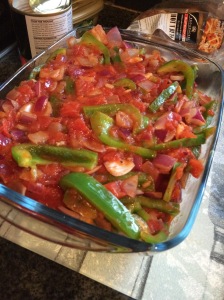
Creole Chicken Casserole Pre-Cooking

So according to that blurb above, the dish I made was a Creole Chicken Casserole. The cookbook I got it from is called the All-Colour Cookbook and it is by Annette Human. If you are interested in the recipe, read below:

Ingredients:

  • 1 cup (200g) white basmati
  • 1 kg chicken portions (I used 3 thighs and 4 breasts)
  • Salt and pepper
  • ½ cup (125ml) sunflower oil
  • 2 smallish green peppers
  • 1 medium red onion
  • 4 cloves garlic
  • 1 can (400g) diced tomatoes
  • 1 teaspoon curry powder
  • 1 teaspoon dried thyme

Instructions:

  1. Cook rice as directed on packaging. Rinse in a colander under cold running water and drain. Set aside.

  2. Season chicken portions with salt and pepper. Heat the oil in a heavy-based saucepan. Quickly fry a couple of chicken portions at a time in oil until golden brown on both sides. Place chicken in shallow ovenproof dish with a volume of 10 cups (2.5L). Sprinkle rice on top.

  3. Halve and seed the green peppers and cut into strips. Peel the onion and chop roughly. Peel and crush garlic. Place in pot in which the chicken was fried. (Leave just enough oil in pot to braise the vegetables.) Add tomatoes with juices, curry powder, and dried thyme. Cover with lid and braise the vegetables for 10 minutes. Season with salt and pepper.

  4. Spoon the vegetables over the rice layer. Pour liquid in after. Cover the container and cook the dish for about 40 minutes at 200ᵒC (390ᵒF) until chicken is tender. Serve with young peas and a beetroot salad.

Serves 6

Creole Chicken Casserole from the All-Colour Cookbook by Annette Human

I think my favourite part about this cookbook is that Annette Human wrote the measurements out in both metric and imperial! I only know and understand imperial measurements in the kitchen which makes it hard for me to follow recipes which need a scale to measure out the grams for every ingredient when following a British recipe. But thankfully this woman thought it out and wrote every ingredient in both grams and cups! What a lifesaver!

Although I did tweak the recipe some (I added an additional pepper as mine were on the small side) I also added more seasoning. And of course as a lover of garlic, I added two more cloves. I’ll include a photo of the original recipe so you can see it without my tweaks.

Creole Chicken Casserole from All-Colour Cookbook by Annette Human

This was a pretty good recipe. A little bland for me (thank goodness I added more seasoning!) but I quite enjoyed it!

I know I will try to do some more South African recipes from this book before I give it back!

I hope you all enjoy this recipe!

Happy eating!

Spinach Lasagna with a “Secret” Ingredient

It is finally a traditional Meatless Monday! Usually I skip the whole meatless thing and end up making something completely different. If I recall, most of my Monday dishes tend to be shrimp dishes at that. At least they were when I would only cook for myself in Holland.

Well this week we are starting off with a good and healthy meal! Lasagna!

Simple. Easy. Healthy. What more could one ask for?!

All a girl needs is a meal with garlic and she is happy! (Well at least this girl is.)

And making a tomato sauce for your lasagna smells amazing. Chopping your garlic and onions, sautéing them in olive oil in a pan, getting it all aromatic – yummmm. That’s like the natural perfume of the kitchen. Best. Smell. EVER.

Until you burn your garlic. That doesn’t smell too good.

Anyway, I got the recipe from Relish though I did tweak it ever so slightly. The direct link to the recipe can be found here. This recipe made a great dinner and it was quick to make! Probably all due to the no-bake lasagna noodles!

Pre-Baking
Pre-Baking

Ingredients:

  • 3 Tablespoons olive oil
  • 1 yellow onion, finely chopped
  • 2 cloves garlic, crushed
  • 1 can (400g) diced tomatoes, undrained
  • 1 can (400g) whole tomatoes, undrained
  • 1 Tablespoon tomato paste
  • 1 teaspoon sugar
  • 1 teaspoon salt
  • 1 Tablespoon dried oregano
  • 1 Tablespoon dried basil
  • ½ teaspoon red pepper flakes
  • ½ teaspoon black pepper
  • 2 ½ cups (625g) ricotta cheese
  • 2 packages (750g each) frozen spinach, thawed, drained, and squeezed dry
  • ½ package (20g) fresh arugula
  • 1 egg (or 2 small eggs)
  • 9 no-cook lasagna noodles
  • 1 pound (453g) mozzarella cheese, thinly sliced
  • 2/3 cup (73g) parmesan cheese, grated

Instructions:

  1. To prepare sauce, heat olive oil in a large saucepan. Add onion and garlic and cook until soft and translucent.

  2. Add tomatoes, tomato paste, sugar, salt, and spices/herbs and stir well. Bring to a boil and allow to simmer uncovered for 30 minutes. If sauce becomes too dry, pour water in one of the cans of tomatoes and mix into tomato mixture until a sufficient amount of liquid has been added. (I only poured half a can of water.)

  3. Preheat oven to 375ᵒF (190ᵒC).

  4. Meanwhile as sauce is simmering away, begin to prepare spinach ricotta mixture. Combine ricotta cheese, spinach, arugula, and an egg in a large bowl; mix well.

  5. Coat the bottom of baking dish with a third of the tomato sauce. Cover with 3 noodles without overlapping (break noodles to fit well in dish), half the ricotta mixture, and half the mozzarella slices. Add half remaining sauce, 3 noodles, remaining ricotta mixture and remaining mozzarella. Top with remaining 3 noodles, remaining sauce, and Parmesan cheese.

  6. Place on baking sheet and bake uncovered for 40 minutes or until bubbly. Let stand for about 15 minutes before cutting into squares.

  7. Serve and enjoy!

Can you guess my secret ingredient? Arugula! Or “rocket” as the Dutch call it! My absolute favourite green leafy vegetable would have to be arugula. It has such a lovely taste that I could add it to any sandwich or wrap.

As for the mozzarella, I ended up using two types of mozza. Now I know all of you have heard of buffalo mozzarella, you know that round moist ball of cheese that is incredibly creamy? Well I also used low-moisture mozzarella, this being a normal square of cheese that just so happens to be mozzarella. I have used this same cheese to make tequeños a few months ago as well. Which reminds me, I need to make those again and show you lot what they are and how to make them.

So, how does one photograph lasagna in the best way? I mean once removing it from the pan you made it in? It comes out so sloppy! Anything within a deep dish comes out in the most unattractive way ever! So how do people photograph lasagna in the best way possible? I could only take a photo from within the dish.

Spinach and Arugula LasagnaHow messy is that! Ugh. Nevertheless the meal was great! And super healthy as there was a minimal amount of salt in it! Low sodium meals is a great way to eventually try and lower your high blood pressure. This being something I had most of my childhood due to my heart issue. Honestly, because of that I cannot handle the taste of super salty dishes anyway. I even buy low sodium soy sauce!

Anyhow, I hope you all enjoy this meal as much as we all have!

Happy eating!

It was a Japanese Style Night!

Asian cuisine is the absolute way to go. I mean Asian women are predominately slim and fit, so it must be the cuisine and way of eating it that keeps them that way. Chopsticks are incredibly slimming. Not because you eat the wood but because of how you go about eating your food. One small bite at a time.

Fabulous right? It is said that if you eat your meal slowly you will become full quickly which is likely how Asian women stay so slim.

So I guess we should all be eating sushi for the rest of our lives! Not that I would mind as I love it!

Although sushi is fantastic, so is what I made for last nights meal.

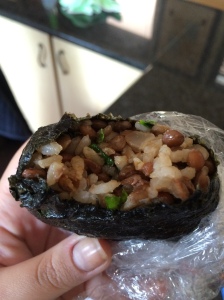
Onigiri is very similar to sushi in the way that it is made of rice and most commonly wrapped around with nori (seaweed), the only difference from sushi is that it’s small while onigiri is usually the size of your palm. Maybe even bigger.

Onigiri

I first encountered onigiri when I lived in Brazil and my Japanese friend brought onigiri to us once for a snack. It was amazing. This little rice ball filled with small slices of nori made my mind whirl. I loved it so much.

Well for last nights meal I didn’t quite make the traditional onigiri ball with plain Japanese rice and seaweed, but went for a different take on it. Mostly because my mom abhors nori and my dad isn’t keen to have any starch in his diet.

I got the recipe to make these protein-packed onigiri balls from BittersweetBlog. Her creation of this treat featured lentils, the most difficult legume to ever make a dish attractive! Though because the lentils did not have to be made into a mush-like consistency, the dish didn’t look as unattractive as any other lentil-filled meal I have ever made.  So that was good! Here is the direct link to the recipe I followed and below will be my re-written recipe.

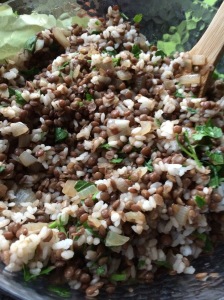
Onigiri before Forming Balls

Ingredients:

  • 1 ½ cups (300g) sushi rice
  • 2 cups (470ml) water
  • 3 Tablespoons olive oil
  • 3 large yellow onions, chopped
  • 1 teaspoon salt
  • 1 Tablespoon Balsamic vinegar
  • ½ teaspoon ground cumin
  • ¼ teaspoon ground cinnamon
  • ½ teaspoon fresh ground pepper
  • 1/3 cup (10g) fresh parsley, chopped
  • 2 cups (400g) lentils, rinsed
  • 4 cups (940ml) water
  • 2 bay leaves
  • Pinch of salt

Instructions:

  1. In a small pot, bring water to boil while at medium heat. Once water is boiling add sushi rice and immediately turn heat to low while covering pot with lid to cook rice. Allow to cook for 15-20 minutes. Once cooked rice should absorb all the water.

  2. While rice is cooking, in a large pot combine lentils and 4 cups water and bring water to a boil. Once at a rapid boil turn down heat until lentils are simmering. Add 2 bay leaves and allow lentils to cook uncovered. Lentils should cook 20-30 minutes.

  3. Meanwhile, heat oil in a large frying pan/wok and add onions to hot oil to sauté. Once onions become translucent and begin to brown ever so slightly on the edges (approx. 10 minutes), add ½ teaspoon of salt and turn heat down. Continue to cook at a low heat stirring occasionally until onions take on a caramelized deep brown color. This should take approximately 30 minutes. Once onions are at desired color remove from heat and add balsamic vinegar and spices. Mix thoroughly and keep aside.

  4. Once lentils are finished cooking, drain excess water and remove bay leaves. Season with salt and keep aside.

  5. When rice and onions are warm enough to touch mix together with lentils and chopped parsley and add additional salt to mixture.

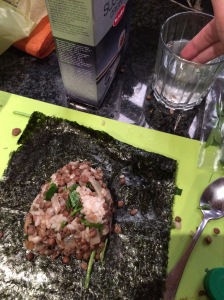
  6. Scoop out about 1/3-1/2 cup of onigiri and press into rounded triangles within your palms. If rice mixture isn’t holding allow to cool further. Or you could place a sheet of nori just beneath your onigiri form and fold the onigiri on your desired shape. Remember that water is necessary to keep nori folded on your onigiri.Onigiri wrapped in Nori

  7. Serve immediately. You can also wrap your onigiri (with and without nori) in plastic wrap to save for another time. Ensure your onigiri is in the fridge to keep firm.

Although this is not the normal onigiri recipe, it came out quite well. I was definitely content but I adore seaweed and rice. All one needs is a little soy sauce and all is good.

We had the onigiri with a Japanese style chicken. This being normal grilled chicken with a soy sauce type liquid poured into the sliced chicken. This sauce contained soy sauce, brown sugar, rice vinegar, ginger, and white wine (because we couldn’t find sake). To me the sauce tasted very similar to teriyaki, but not as sweet. It was a unique taste, that’s for sure. The recipe we followed was from the Best Recipe Box, the direct recipe is here. So if you want to do a lentil nori wrapped origini with the chicken you now can!

Final look for Onigiri

I’ve been eating the onigiri all through the morning as a breakfast. Which probably isn’t the best thing for someone, but I am very American in the way that I eat leftovers for breakfast. I’m known to eat pasta, rice, soup, and now onigiri for breakfast. I also like to have cereal and yoghurt for dinner or a late night snack. How odd am I? Oh well, the onigiri was delicious and I hope you all enjoy it too!

And if you are wondering, I ended up making sixteen onigiri rolls, most with seaweed but five were plain rice and lentil onigiri rolls. Though the original recipe said 24 rolls can be made.

Anyway, happy eating everyone!

‘Tis the Season to Bake, December Mint Baking!

Well hello everyone! It has been a mighty long time since I’ve posted. I’ve just become so lazy. I’m so sorry! The worst part is I’ve made some great meals that you all should know about. I’ll have to make them again in the New Year and share them with you then!

So it is December, the month of baking! You know what? I dove right into that! I started off with gingerbread men (and other shapes) but they just didn’t taste all too good. I’ll give you the link where I got the recipe, though I won’t re-write the recipe for the gingerbread cookies. Neither my mom nor I found them all too tasty, though my biggest fan liked them, thanks Daddy!

"Tastes like kruidnoten!"

Today though I’ve made chocolate cookies in the lovely Christmas shapes as well!

The best part of the month is definitely that the boyfriend decided to be nice and took me peppermint extract shopping so the month of December is definitely decked out in peppermint treats. I am in the mood to make peppermint patties, BUT for now I’m sticking to peppermint icing for cookies.

So what you don’t know is that to my family I am a pretty bah-humbug type person when it comes to Christmas but since having been in Canada with a group of lovely Dutch girls some two years ago, I have become filled with Christmas spirit. I mean it was my idea we have a wreath on our door and I chose the location of our Christmas tree! Both of which I’ll show you. I also keep telling mom to bring down some gifts so I can wrap them and place them beneath the tree.

Welcome to our humble abode!

Christmas Tree

Although I mostly want them there so that when my sister and her boyfriend come they can see some gifts below and begin their ritual of feeling and shaking of the wrapped presents. Yeah, my sister is a nineteen year old present shaker! I don’t mind keeping her guessing though!

Anyway, back to these cookies.

What do y’all think of brownies? And chocolate cookies? And combined?

Well I know most people adore brownies, so do you also enjoy cookies which taste like brownies?

It is really odd that these taste like brownies, and probably really bad as now I’ll gain an incredible amount of weight. I’m going to have to hop right into 2015 by sticking to a gym. It’ll be Taiji, Pilates, Gym, Pilates, Gym as my weekday! Yikes!

So back to these cookies, I got the recipe from here and followed the instructions perfectly. Well except for keeping the dough in the fridge to keep firm.

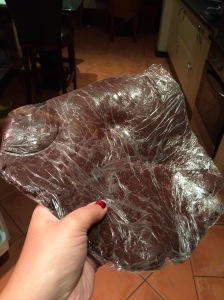
ROCK HARD flattened dough

The recipe states to return dough to fridge between uses to keep hard, but I found it was far too hard in the fridge and preferred keeping it out between rolling and cutting the shapes out. Anyway, here is the recipe:

Ingredients:

  • 2 cups (500g) unsalted butter (at room temperature)
  • 2 cups (400g) sugar
  • 2 large eggs
  • 3 tsp vanilla
  • 4 cups (500g) all-purpose flour
  • 1 1/2 cups (177g) cocoa powder
  • 1 tsp salt

Instructions:

  1. Cream the butter and sugar together in the bowl of an electric mixer on low to medium speed (Use a paddle attachment). Mix until thoroughly incorporated – for about one minute. Scrape down the sides of the bowl with a plastic spatula and mix again for a few seconds more. Over mixing the butter and sugar in this step will cause too much air to be incorporated into the dough. If you’d like a light and fluffy cookie, that’s ideal, however the dough will spread more during baking; not ideal if you’d like the cookie to hold its shape.
  2. Add eggs slowly and mix. Scrape down the bowl with your spatula at least once and mix again.
  3. Add liquid vanilla extract. Stir briefly.
  4. Sift your dry ingredients together. 
  5. Add all of the flour mixture to the bowl. *Place a large tea towel or two small tea towels between the edge of the bowl and the electric mixer so that the flour won’t escape. Mix on low speed for 30 seconds. Remove the tea towels and observe the dough mixing; when it clumps around the paddle attachment it’s ready. It’s also important at this stage not to over mix the dough.
  6. Roll the dough out between 2 large pieces of parchment paper. Place on a baking sheet and into the fridge for a minimum of 1 hour.
  7. Remove from refrigerator and allow dough to soften until dough doesn’t break when rolled. Cut out cookie shapes. Place on parchment paper-lined baking sheet. Re-roll scraps and repeat.
  8. Preheat your oven to 350°F or 176°C.
  9. Bake cookies for 8-12 minutes or until the center of the cookie no longer looks wet. The baking time will depend on the size of your cookie.
  10. Let cookies cool to room temperature and decorate!

IMG_8696

My cookies ended up looking like that, though I lost many while trying to get to this stage. These are some brittle cookies! The recipe I provided for you can be halved. If you halve it you will get the contents of the container above plus a few more. So possibly thirty small cookies. I still have the rock solid dough in cling film to make which would be the whole recipe. It is a lot of cookies!

Anyway, that’s what has been going on in our house. A lot of baking and Christmas decorating.

I hope your households are equally as festive if you celebrate Christmas. If not, enjoy your December!

P.S. Here is a photo of the Johannesburg nighttime skyline:

Skyline

Savory Argentine Treats

¡Qué maravilloso!

I made the best food ever. Food that I grew up on. There are many foods that are popular in South America. Foods that can be found in several Latin American countries, foods like empanadas, arepas, rice and beans, etc.

But I know certain foods as being from one country. To me arepas are only Venezuelan. Arepas con queso blanco – yum! While empanadas are best made in the province of Salta in Argentina. Though the province of Tucumán holds an annual National Empanada Festival, neat right? But according to my Argentine friend Nico, there is a dispute about where the best are from, is it Salta, Tucumán, or Buenos Aires? When I lived in Buenos Aires my teacher informed me that it was Salta so I will stick to that fact. ¡Gracias Paola!

I remember seeing people dressed as giant empanadas dancing downtown in Buenos Aires. Poor guys in those suits in the middle of summer, but the guys sure caught people’s attention to visit the empanada restaurant.

Anyway, I decided to give empanadas a go!

 Trial Empanadas

I’m glad I did it!

I got the recipe from here, but I tweaked it some.

Ingredients:

For Pastry:

  • 2 ¼ cup (350g) plain flour
  • Pinch salt
  • Pinch baking powder
  • ¾ cup (145g) butter, melted
  • 1 egg, beaten
  • ½ cup (100ml) lukewarm water

For Filling:

  • 1 Tablespoon olive oil
  • ½ yellow onion, finely chopped
  • 1 clove garlic, minced
  • ½ red bell pepper, finely chopped
  • 1 teaspoon tomato paste
  • 1 teaspoon smoked paprika
  • 1 teaspoon cumin
  • ½ teaspoon cayenne pepper
  • 1 (200g) chicken breast, cooked and shredded
  • 8 green olives, chopped
  • Salt and pepper to taste

Instructions:

  1. First make the pastry. Sift the flour, salt, and baking powder into a large bowl. Stir in butter and one of the eggs and mix until combined well. Gradually add some lukewarm water if your pastry is too dry. Wrap your pastry in plastic wrap and all to firm up in fridge for thirty minutes.

  2. To make the filling heat oil in small frying pan and add onion. Cook for 3-5 minutes, then add garlic and bell pepper and cook for an additional couple minutes or until soft and aromatic.

  3. Stir in tomato paste, paprika powder, cumin, and cayenne pepper and mix well. Add olives and chicken, don’t forget to season with salt and pepper. Allow flavours to combine for two minutes. If chicken mixture is too dry add a splash of water and set aside to cool.

  4. Preheat oven to 200ᵒC (392ᵒF) and begin to roll out the pastry to 3mm (1/8 inch) and cut out circles of approximately 14cm (5 ½ inch) diameter. Divide the filling between the pastry circles and moisten edges with water to allow to stick.

  5. Fold the pastry over to enclose the filling and pinch the edges together, use a fork to press the edges tightly together. Transfer to a baking sheet and brush with milk to glaze. Bake for 15 minutes or until golden.

Easiest recipe ever! Except I made my pastry with both eggs that were stated in the original recipe and instead of rolling the pastry and shaping with a circular tool, I just pressed everything together with my hands. I didn’t use additional water or milk either as my pastry was already too eggy/oily.

I can honestly tell you that I hate English recipes. The original recipe comes from a website that ends in .co.uk and it bothers me that it says you’ll need two eggs but instead you only use one! What is the point of that other egg!? The original recipe doesn’t even use the other egg for an egg wash before baking it! They use milk! UGH!! I always have issues with English recipes!

Anyway my pastry is just a bit too brittle, but the flavours are all there. Tastes just like Argentina! I know my sister and father are jealous (neither of them are here to experience my empanadas)!

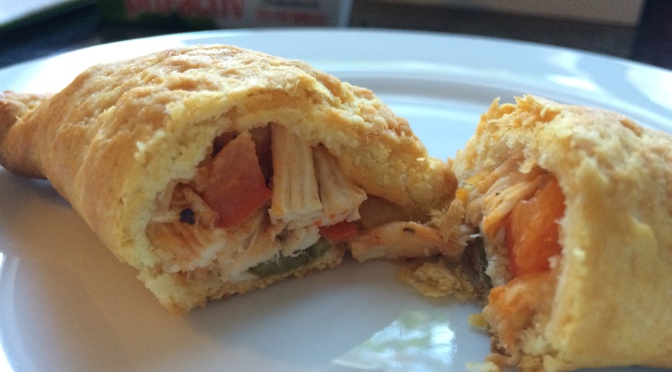
Empanadas de Pollo

Even with my little mishap, this came out fantastic!

Only thing missing in our house are medialunas (another Argentine pastry)! But those are a little more difficult to make so I may try those another day. Maybe when my sister is in the area. She is the Argentine after all (well, she was born in Argentina).

If you end up making this recipe I hope you enjoy it just as much as my mother and I have!

¡Buen provecho!

P.S.

I know this post had nothing to do with my Pumpkin Everything month, so I thought I’d add my new friend to the mix.

Meet Dr. Rockskin, the Rock’n Roll Pumpkin:

Dr. RockskinDr. Rockskin

I’ve never named a jack’o lantern before, but I thought to do so for a friend.

Anyway, enjoy the food and the remainder of your day!